Parthenon by Marco A. Delgado
Parthenon
"Parthenon" by Marco A. Delgado
In this tutorial I am going to explain how I made the image of the Parthenon. I have seen many different photographs and drawings of the Parthenon from different angles, in order to have an idea, as clear as possible, about its characteristics and proportions. I have obtained a lot of information from several books of History and Art.

Using Softimage XSI, in the option camera view, we activate Rotoscope and we load the photograph we like the most. We join the angle of our camera with the one of the photograph using the grid of the scene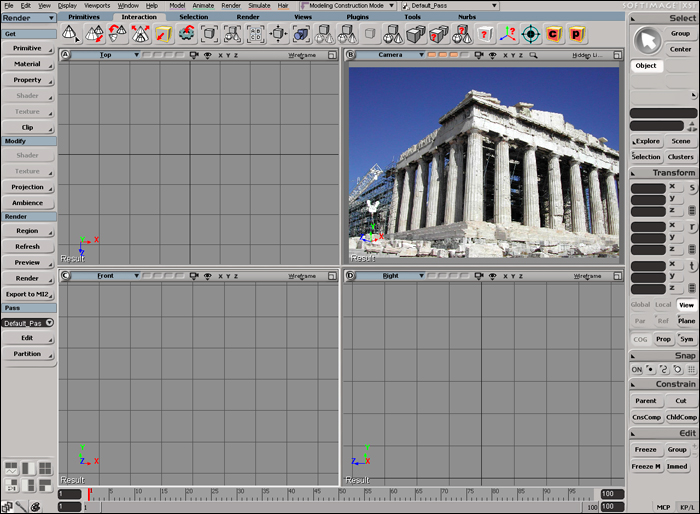
1. MODELLING.
If the photograph does not allow us to see the model, we can remove or replace it by another one in a grey range. Now we can begin to model the objects. We begin with the columns.
3Dtutorials.sk recommendation:
To maximise the realism of your 3D objects we recommend to use high quality architecture photo references from the #1 texture website www.environment-textures.com
We load an image or a drawing of the base of the column in the top view option in order to model it accurately.
We also load a lateral image of the column in the front view option to see its height and proportions. We create a circle for the base of the column. We repeat several small cylinders and by means of a Boolean Difference we made the cuts in the column.
We make an Extrusion Along Axis of the height and the correct axis (Y). In this way we create the column. We place a cylinder, widened in its upper base and not very high, in the upper part of the column. For the abacus we use a cube scaled in (Y), subdivided in order to make it old-fashioned.
We select the 3 objects of the column and we create a model. We duplicate the model 7 times in axis (Z), in this way we obtain 8 central columns. We select the first and the last columns and we duplicate them 12 times in axis (X). We also place 6 columns background, behind the 8 central columns.
In order to create the architraves we make 7 rectangles, of a width similar to the existing space among the columns. We make a double line of architraves. When selecting them, we proceed to their duplication and a 90 degrees rotation, and we get the lateral line of architraves. We make it for both sides of the Parthenon.
The metopes are made with cubes, alternated with more detailed cubes, the triglyph. We made a small plane polygon, which we cut it in a series of steps, after an extrude we get the triglyph. We place them in the laterals of the Parthenon, placing some hollows according to the reference photographs.
To create the platform in the base of the columns, we make a cube scaled in (Z) for the groups of 3 stylobates. We multiply a scaled cube in (Z) as far as the end of the columns. We do the same for the laterals. For the cornice we use the Linear Curve tool. We created the stepped profile and we made an extrude along axis (Z), of the same size that the triglyph. We duplicate them in axis (Z) as far as the end of the columns.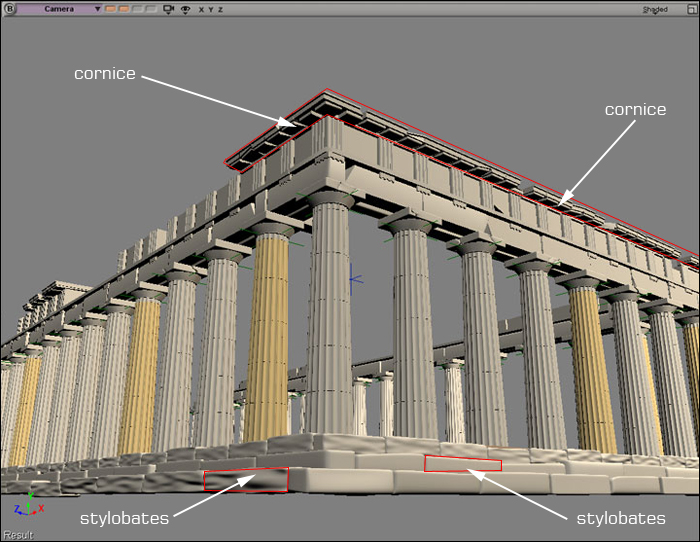
The pediment is created with subdivided and modified cubes by means of booleans operations. It is necessary to scale them to create the triangular shape of the pediment. We will place some objects of the cornice in the upper part, according to the reference photographs.
For the objects of the foreground, we take one of the columns created formerly and we cut it to make it smaller.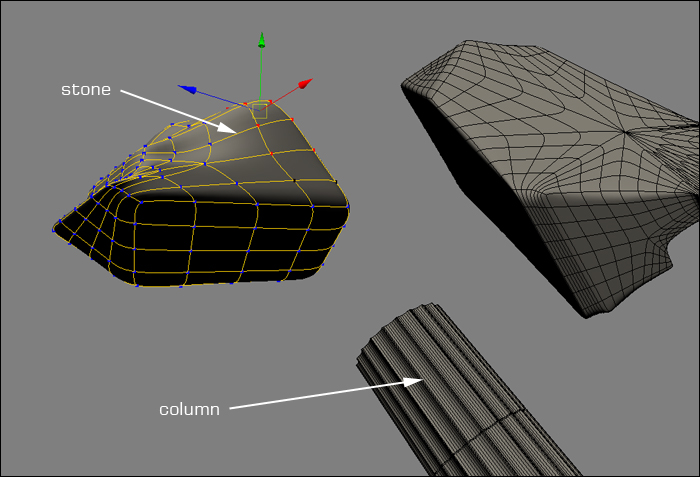
2. TEXTURES.
This model is very easy to texture. We only use cylindrical and cubical projections. For the columns we use a texture created in Photoshop combining several marble textures.
The rest of the objects have different textures applied in a cubical projection. We have used various marble textures to get a different aspect for every block, varying the size of the texture and rotating the angle.
We made a bump layer for every object with these textures.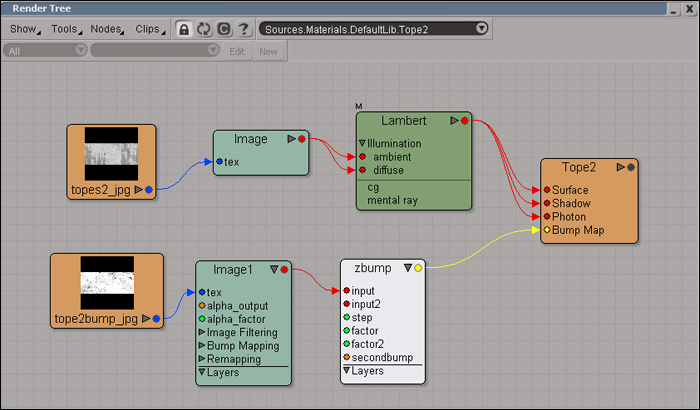
3. ILLUMINATION AND RENDER.
To illuminate the scene I have removed the light of the scene and the ambient is black. I have placed one spot light in front of the Parthenon, slightly yellow, projecting heavy shades.
To give a greater realism I have used the option Final Gathering. I have also added an environment shader, which is a HDRI image. These are the values: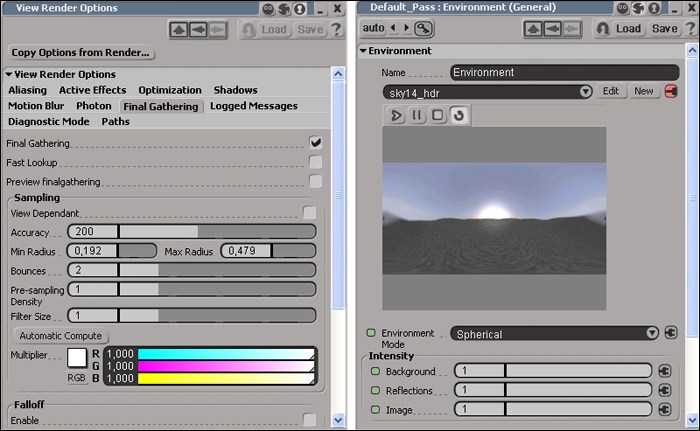
I have also added a Pass of Ambient Occlusion to obtain more realism and contrast. Finally, using Photoshop CS2, I have varied the colour, the brightness, the saturation and I have added some grain.
Many thanks.
(c) Marco A. Delgado, webmaster@pixeltale.comwww.pixeltale.com
Click for viewing tutorial on free3dtutorials .


