


Yellow house - part 3. by Huseyin Karaaslan
Yellow house – part 3
"Yellow house - part 3." by Huseyin Karaaslan
Hello friends. Based on my work ´The yellow house´, I have tried to sum up how it was created. It consists of 3 parts: modelling, texturing and render. In the third part called 'render', we shall use the 'V-ray' render motor.
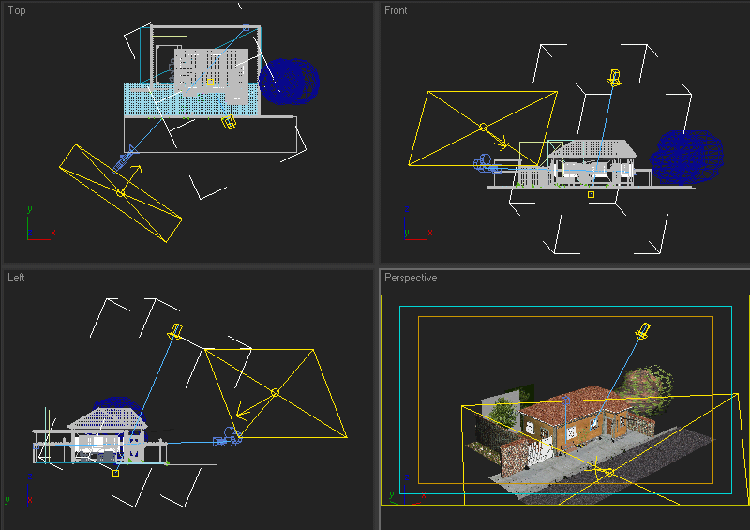
1- Placing the lights

3Dtutorials.sk recommendation:
To maximise the realism of your 3D rendering we recommend to use high quality house photo textures from the #1 texture website www.environment-textures.com
2- 'Vray' adjustments

1) Let us turn off 'default lights' and thus leave no lights that we haven't specificed on the scene.

2) Let us select 'adaptive subdive' and prevent 'antialiasing' from creating any problems. If the size of the render increases or if by any reason 'antialiasing' should create problems, let us then increase the values.
3) As a 'antialiasing' filter, we select 'Catmull-Rom'. This gives us the opportunity to get a more clear render.

4) Let us activate 'GI'.

5) Since I used 'direct light', I had no shadow problems and for that reason I selected the 'low' option on the 'irradiance map'.
6) The 'HSph subdivs' and 'Interp subdivs' options prevent the 'smoky' (or whatever it is called) effect that appears on the render.
7) By clicking the options shown by the number 3 on the picture, we can see the 'prepasses' during the render process.
8) If we want to change the place of just one model or add a few more details and render again, we can save the 'prepasses' by selecting 'save to file' in the 'irradiance map' section.
We can access the saved file by clicking 'browse...' but to use this, we must select the 'from file' option first.
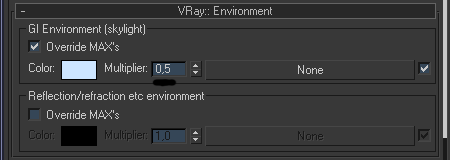
9) From the 'environment' section, let us adjust the 'sky light' values.
3- 'Direct light' adjustments
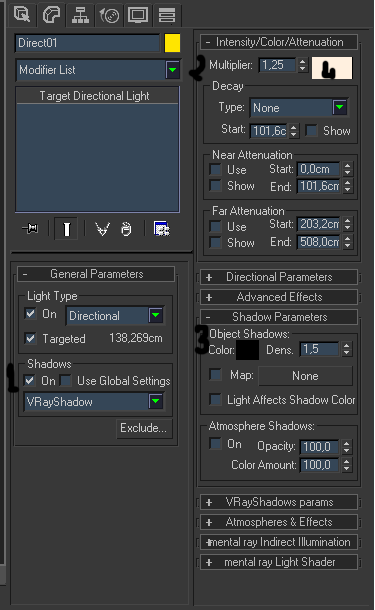
1) Let us activate 'shadows'.
2) Let us adjust the light values.
3) Since the light is sunlight, let us make it somewhat reddish.
4) We can adjust the intensity of the shadows in 'shadow parameters' section. Since both my light sources lighten up the shadows, I increased the shadow intensity.
4- 'Vraylight' adjustments
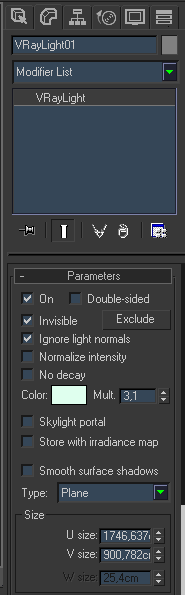
1) Let us select 'invisible' and thus prevent the light source from being seen during render.
2) Let us adjust the light values.
3) To give some brightness to the scene, let us add some greenish colour to the light.
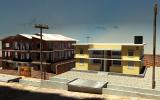
5- Result
Good luck everyone. I hope this has been a helpful lesson for you all.
(c) Huseiyn Karaaslan, huseyin-karaaslan@hotmail.com
Click for viewing tutorial on free3dtutorials .